
OpenClaw 个人部署经验 - Mac & Discord 篇

OpenClaw 个人部署经验 - Mac & Discord 篇
记录在闲置 MBP 上部署和使用 OpenClaw 的实践经验
前言
阅读前须知:
如果你没有以下基础能力:
- 科学上网能力(能够独立配置和使用代理工具)
- 命令行操作能力(熟悉终端、shell 基本操作)
不建议自行搭建 OpenClaw,这超出了你的个人能力范围。
替代方案:
能翻墙不是一切的前提。各大互联网大厂都推出了自己各种各样形式的国产 Claw 部署方案。
这些方案开箱即用,无需折腾。自己搭建 OpenClaw 是为了获得更个性化、更自主控制的 AI 助手体验——自由选择模型、定制 Agent、完全掌控数据。
网络环境配置
稳定的网络环境是刚需。
网络要求
部署过程中需要访问以下服务:
- pnpm 包管理器仓库(部分源在海外)
- GitHub 代码托管平台
- 各大模型厂商 API 服务
建议:
- 确保网络连接稳定
- 配置合适的镜像源加速访问
- 国内模型厂商 API 建议走直连
网络加速方案
💡 提示:以下步骤针对有海外访问需求的用户。如仅需使用国内模型服务,可跳过本节。
方案一:使用网络加速工具
对于需要访问海外服务的场景,使用网络加速工具的 TUN 模式即可。TUN 模式无需配置环境变量,终端和 CLI 工具自动生效。
⚠️ 不要配置 HTTP_PROXY 等环境变量,使用 TUN 模式后无需任何环境变量配置。
规则集配置:
从公开渠道搜索 clash rules 或 clash 分流规则,选择适合的规则集。
要点:
- GitHub、pnpm 等开发域名走加速
- 百炼、Kimi、GLM 等国内模型厂商 API 走直连
方案二:使用镜像源
仅使用国内服务时,可配置镜像源加速访问。完整配置指南见下文章节。
国内镜像源完整配置指南
💡 适用场景:中国大陆用户部署时,使用国内镜像源可显著提升下载安装速度。
1. pnpm(Node.js 包管理器)
阿里云镜像:https://npm.aliyun.com/
配置方法:
# 永久设置 pnpm 镜像
pnpm config set registry https://npm.aliyun.com/

# 验证配置
pnpm config get registry
2. Python / pip
阿里云镜像:http://mirrors.aliyun.com/pypi/simple/
配置方法:
# 临时使用
pip install <package> -i http://mirrors.aliyun.com/pypi/simple/

# 永久设置(macOS/Linux)
mkdir -p ~/.pip && cat > ~/.pip/pip.conf << EOF
[global]
index-url = http://mirrors.aliyun.com/pypi/simple/
[install]
trusted-host = mirrors.aliyun.com
EOF
💡 说明:部分 Skills 使用 Python,建议配置 pip 镜像。
3. Homebrew(macOS)
阿里云镜像:https://mirrors.aliyun.com/homebrew/
配置方法:
# 1. 替换 brew.git(Homebrew 源代码仓库)
cd "$(brew --repo)"
git remote set-url origin https://mirrors.aliyun.com/homebrew/brew.git

# 2. 替换 homebrew-core.git(核心软件仓库)
cd "$(brew --repo homebrew/core)"
git remote set-url origin https://mirrors.aliyun.com/homebrew/homebrew-core.git

# 3. 替换 homebrew-cask.git(macOS 应用仓库)
cd "$(brew --repo homebrew/cask)"
git remote set-url origin https://mirrors.aliyun.com/homebrew/homebrew-cask.git

# 4. 配置 Bottles 镜像(预编译二进制包)
echo 'export HOMEBREW_BOTTLE_DOMAIN=https://mirrors.aliyun.com/homebrew-bottles' >> ~/.zshrc
source ~/.zshrc
镜像源配置检查清单
部署 OpenClaw 前,建议检查以下配置:
💡 提示:以上镜像源配置可根据实际需求选择性使用。如仅需部署 OpenClaw,配置 pnpm 和 Homebrew 镜像即可满足大部分需求。
前置准备:命令行 AI 工具
OpenClaw 的配置文件较为复杂,推荐使用命令行 AI 工具辅助配置和维护。
推荐工具
| 工具 | 说明 |
|---|---|
| opencode | 交互式 CLI AI 助手,支持多模型 |
| claude-code | Anthropic 官方 CLI 工具 |
| gemini-cli | Google Gemini CLI 工具 |
| qoder-cli | Qoder CLI,AI 编程终端工具(阿里系) |
| iflow | 心流开放平台 CLI,免费使用 Kimi/Qwen/GLM 等前沿模型(阿里系) |
配置文件编辑建议
OpenClaw 配置文件 openclaw.json 结构复杂,建议:
- 使用 opencode 等工具辅助生成和校验
- 修改前备份:
cp openclaw.json openclaw.json.bak - 分段调试,逐步添加配置
- 使用
openclaw doctor验证配置
环境准备
硬件环境
- 设备:MacBook Pro(闲置机器)
- 系统:macOS(darwin)
- 架构:x86_64 / arm64
关闭系统休眠
⚠️ 仅针对 MacBook 系列:Mac Mini、Mac Studio 等主机设备无需此步骤。
闲置 MBP 作为服务器运行,需要关闭系统休眠以保证 OpenClaw 持续运行。
方式一:使用 pmset 工具:
# 查看当前电源设置
pmset -g

# 禁用休眠(需要 sudo)
sudo pmset -a disablesleep 1

# 恢复休眠
sudo pmset -a disablesleep 0方式二:外接显示屏:
MBP 外接显示器时,合盖后会自动进入盒盖模式(Clamshell Mode),保持运行不休眠。
💡 推荐:外接显示器方案更简单,无需修改系统设置,断开显示器后恢复默认行为。
软件依赖
安装顺序
| 顺序 | 组件 | 安装命令 | 说明 |
|---|---|---|---|
| 1 | Homebrew | 官网脚本安装 | macOS 包管理器 |
| 2 | n | brew install n | Node.js 版本管理器,避免 nvm/fnm 的配置问题 |
| 3 | Node.js | sudo n lts | 通过 n 安装 LTS 版本 |
| 4 | pnpm | npm install -g pnpm | 包管理器,用于安装 OpenClaw |
| 5 | Python | brew install [email protected] | Python 运行时(Skills 使用) |
| 6 | Tailscale | brew install tailscale | 远程访问(可选) |
| 7 | OpenClaw | pnpm add -g openclaw | 核心服务 |
| 8 | jq | brew install jq | JSON 处理,用于配置文件 |
| 9 | Whisper | brew install whisper | 语音转文字(可选) |
⚠️ 为什么不推荐 nvm/fnm:nvm/fnm 通过 shell hook 注入环境变量,OpenClaw 的 exec 执行环境可能无法正确继承。需要额外配置:
shellEnv:注入 nvm/fnm 初始化脚本vars.PATH:补充 Node.js 路径以覆盖所有场景配置繁琐,容易遗漏。n 直接安装到系统路径,无需额外配置。
依赖检查
node --version
pnpm --version
python3 --version
openclaw --version
按顺序安装完成后,跳转 初始化 章节。
安装准备
1. 准备 API Key
LLM 提供商
OpenClaw 需要配置 LLM 提供商。以下是常用选项:
| 提供商 | 说明 |
|---|---|
| 百炼 (Bailian) | 阿里云,支持 Qwen、GLM、Kimi 等 |
| OpenAI | GPT 系列 |
| Anthropic | Claude 系列 |
本例使用百炼 Coding Plan 套餐:
- 获取 API Key:访问阿里云百炼控制台
- Base URL:
https://coding.dashscope.aliyuncs.com/apps/anthropic
💡 套餐选择建议:
- Coding Plan 适合编程场景,性价比高
- 建议自行搜索厂商套餐攻略,选择适合的方案
- 也可使用中转站服务,或多厂商叠加,自行寻找最佳性价比方案
GitHub Personal Access Token
建议准备 GitHub Token,避免以下工具被限流:
- Homebrew(从 GitHub 拉取 formula)
ghCLI 工具- pnpm/npm 从 GitHub 安装包
获取方式:
- 访问 GitHub Settings → Developer settings → Personal access tokens
- 选择 Tokens (classic)(Fine-grained 不支持 Packages 访问)
- 点击 Generate new token (classic)
- 填写:
- Note:描述用途
- Expiration:选择有效期
- Scopes:勾选
repo和read:packages
- 点击 Generate token 并复制保存
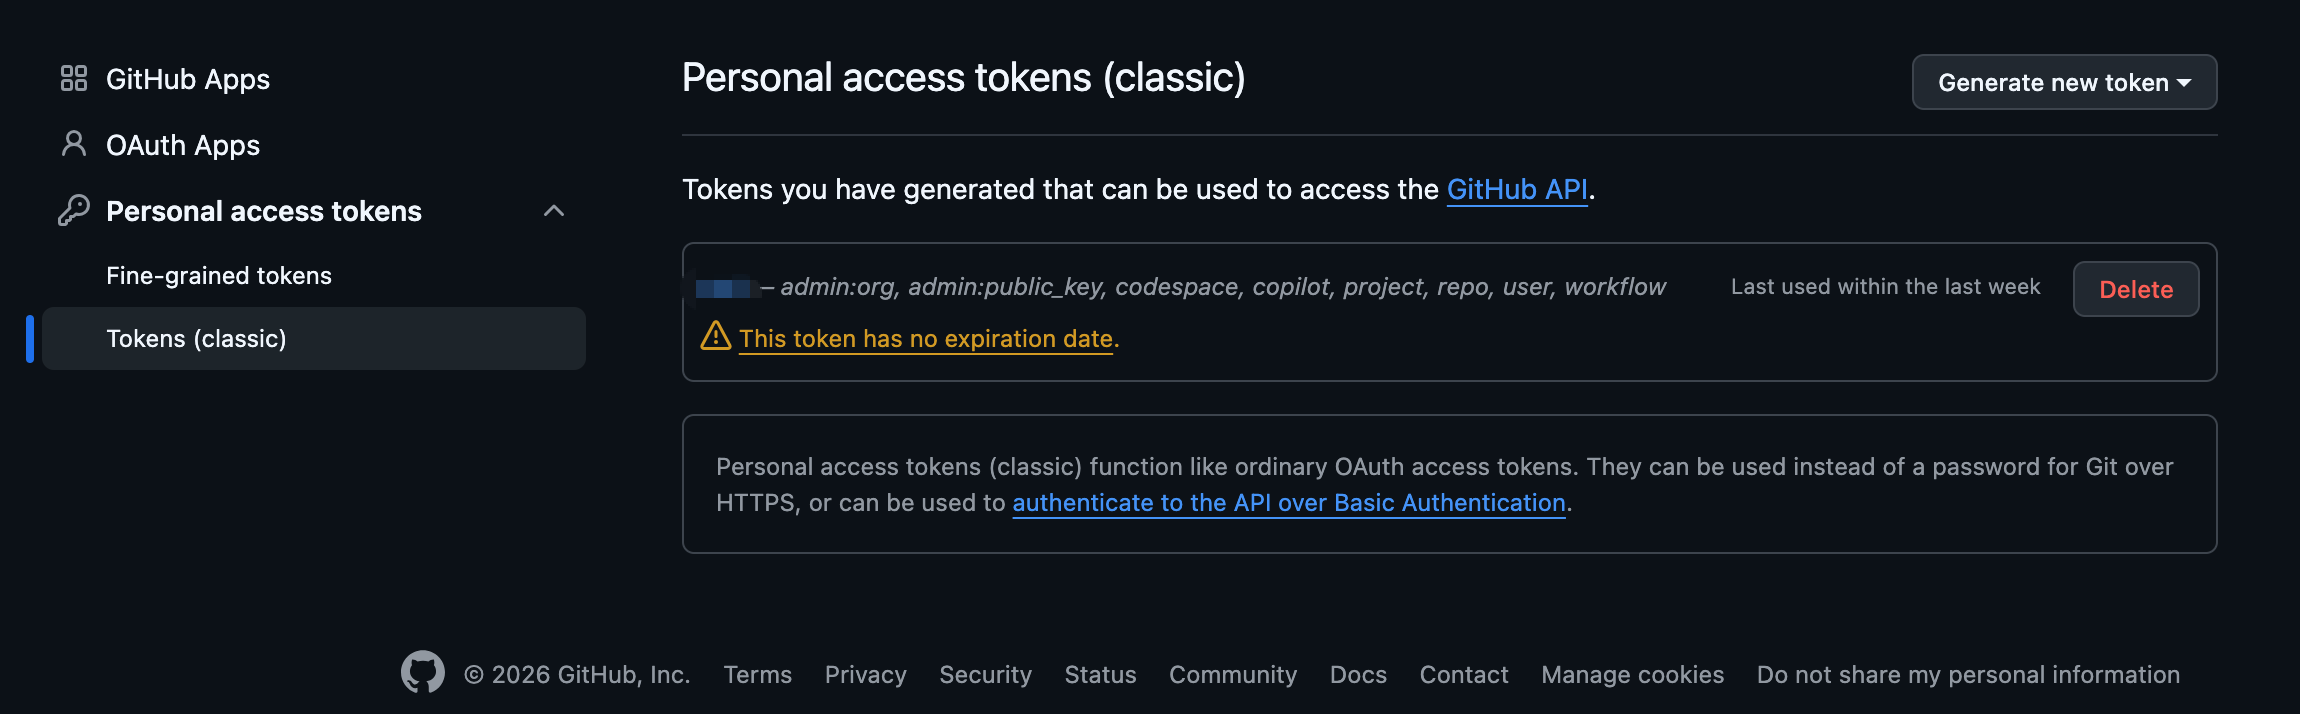
配置环境变量:
# 添加到 ~/.zshrc 或 ~/.bashrc
export GH_TOKEN=your_github_token                    # gh CLI
export HOMEBREW_GITHUB_API_TOKEN=your_github_token   # Homebrew
💡 配置后可显著减少 GitHub API 限流问题
初始化
CLI Onboard
首次安装后运行:
openclaw onboardQuickStart vs Advanced:
| 模式 | 说明 |
|---|---|
| QuickStart | 使用默认配置,快速开始 |
| Advanced | 完全控制,自定义所有选项 |
⚠️ Onboarding 跳过提示:
- 如果计划自定义模型厂商(如百炼、中转站等),Model/Auth 步骤可以 Skip,后续手动配置
openclaw.json- Plugins / Skills / Hooks 前期均可 Skip,等明确需求后再按需安装
Advanced 模式步骤:
- Model/Auth — 选择 LLM 提供商和模型,支持:
- API Key 认证
- OAuth 认证
- 自定义提供商(OpenAI/Anthropic 兼容)
- Workspace — 设置工作目录(默认
~/.openclaw/workspace) - Gateway — 配置端口、绑定地址、认证模式
- Channels — 配置通信渠道(Discord、Telegram 等)
- Daemon — 安装后台服务(launchd/systemd)
- Health check — 启动 Gateway 并验证运行状态
- Skills — 安装推荐技能
自定义提供商配置示例
💡 JSON5 语法:
openclaw.json使用 JSON5 格式,支持以下特性:
- 注释:
// 单行注释和/* 多行注释 */- 尾随逗号:对象和数组最后一项后可加逗号
- 无引号键名:
{ foo: "bar" }等同于{ "foo": "bar" }- 多行字符串:支持换行,便于阅读长文本
配置示例中使用
//注释引导关键字段,如foo, bar ...表示还有更多同类配置项,请参考官方文档。
以配置百炼(Anthropic 协议)为例,在 openclaw.json 中添加:
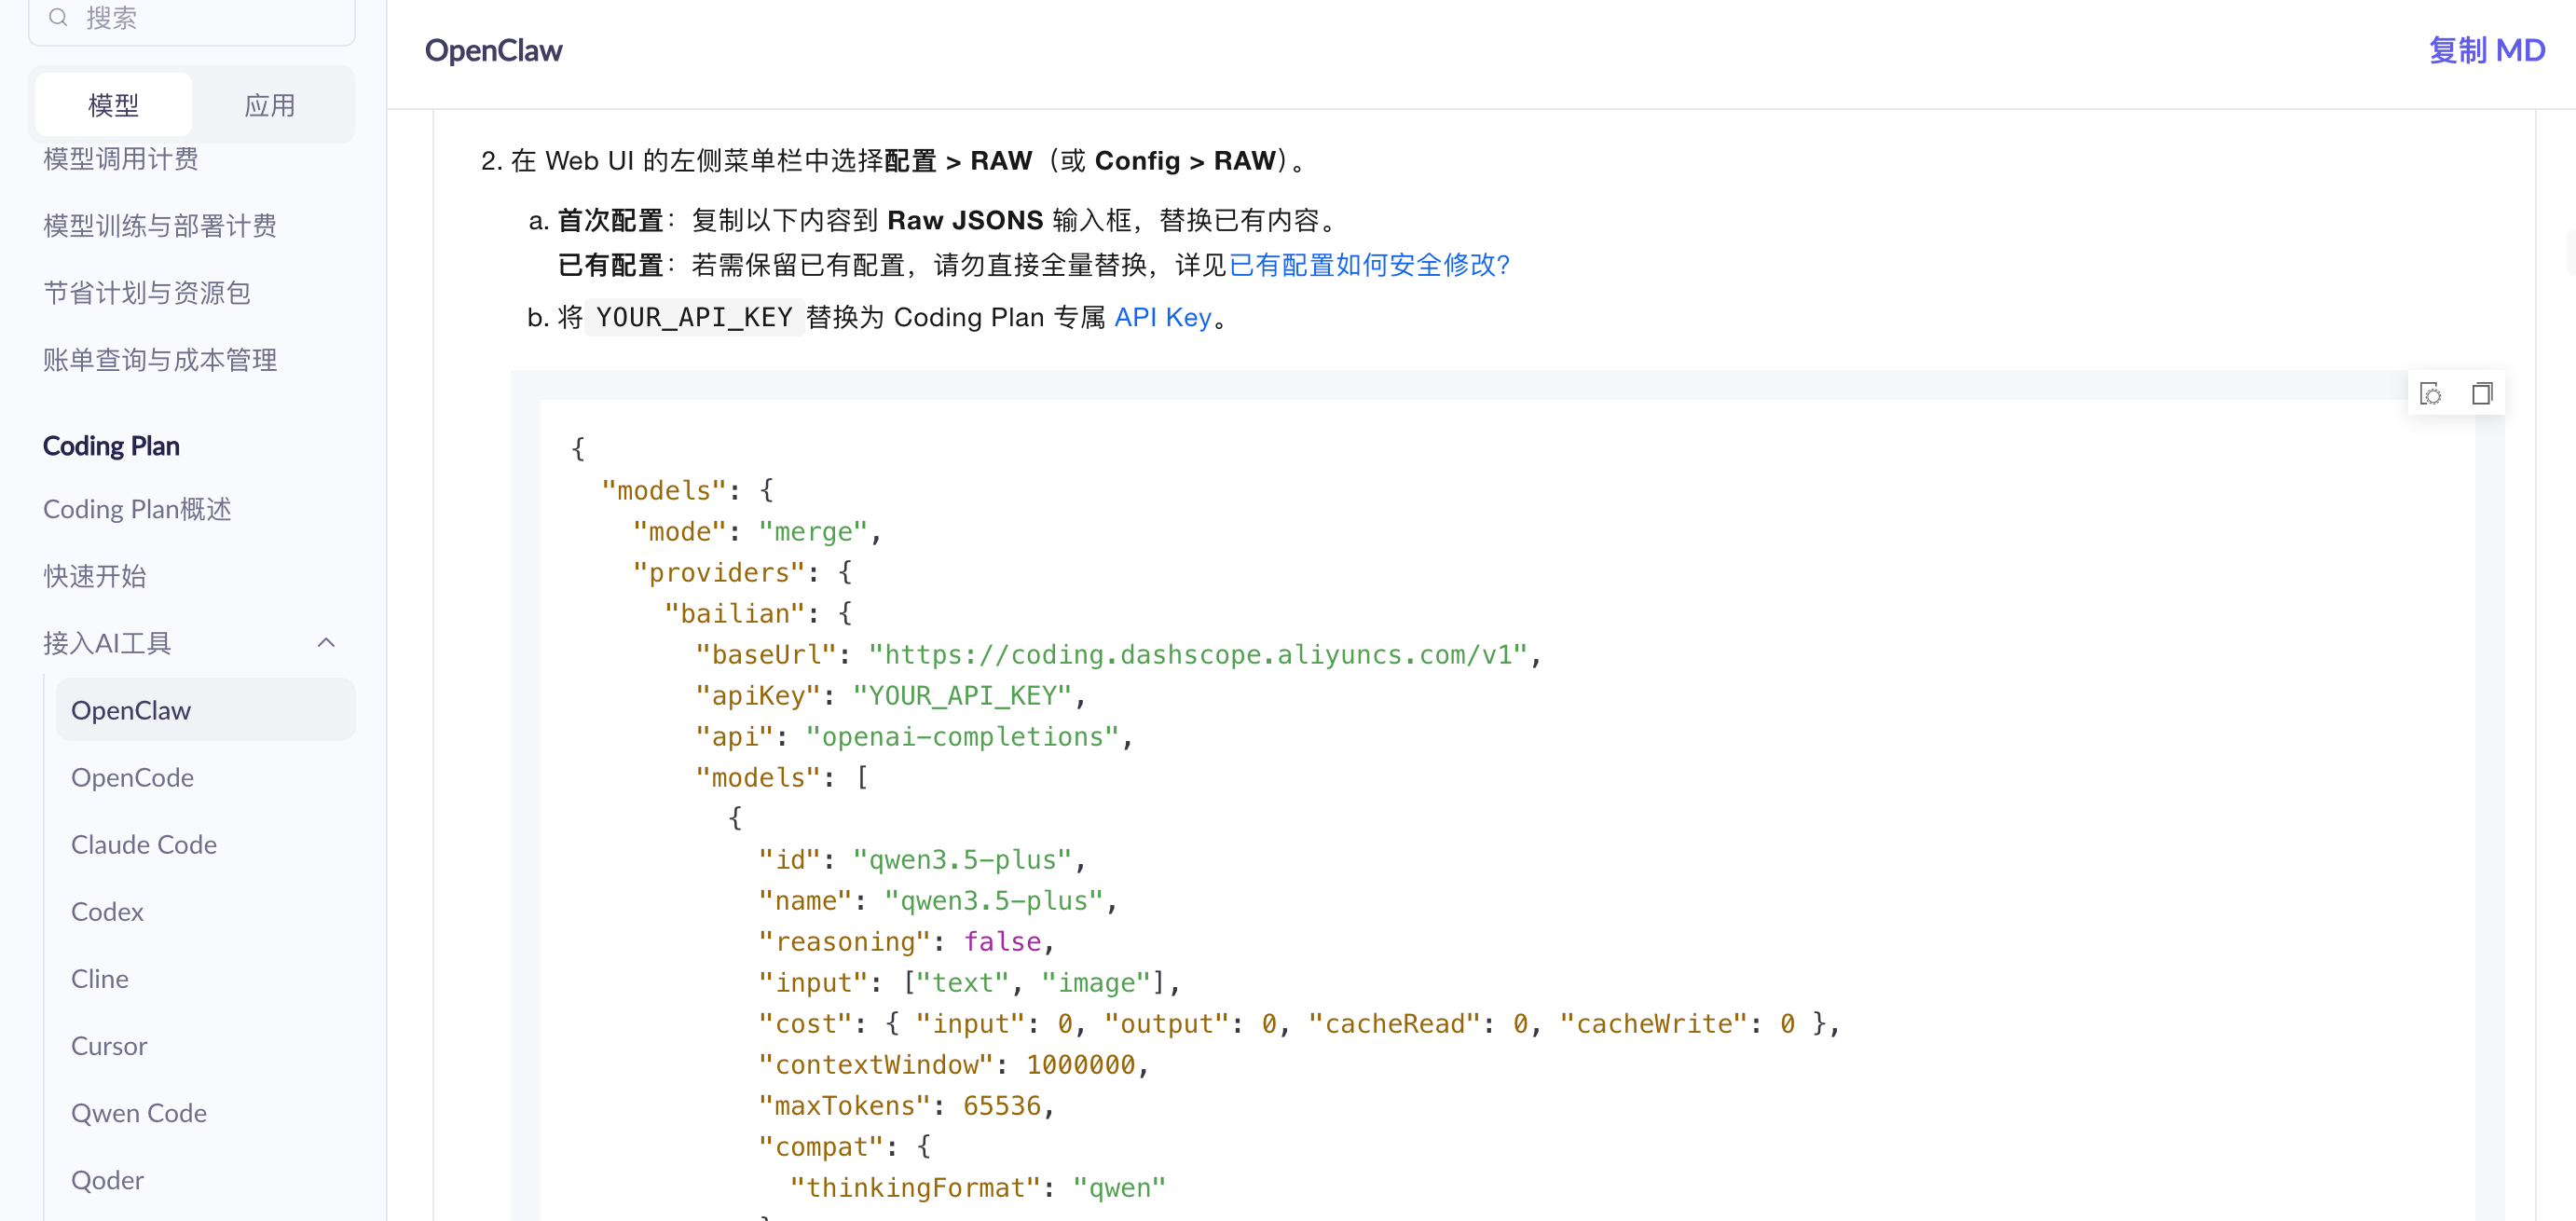
{
  "models": {
    "mode": "merge",
    "providers": {
      "bailian": {
        "baseUrl": "https://coding.dashscope.aliyuncs.com/apps/anthropic",
        "apiKey": "YOUR_API_KEY",
        "api": "anthropic-messages",
        "models": [
          {
            "id": "qwen3.5-plus",
            "name": "Qwen 3.5 Plus",
            "contextWindow": 1000000,
            "maxTokens": 32000
          },
          {
            "id": "glm-5",
            "name": "GLM-5",
            "contextWindow": 202752,
            "maxTokens": 8192
          }
        ]
      }
    }
  },
  "agents": {
    "defaults": {
      "model": {
        "primary": "bailian/qwen3.5-plus"
        // fallbacks, reasoning 等更多配置请参考官方文档
      }
      // 其他配置:heartbeat, tools, sandbox 等
    }
  }
}关键字段说明:
| 字段 | 说明 |
|---|---|
api | 协议类型:anthropic-messages / openai-completions / openai-responses |
baseUrl | API 端点地址 |
apiKey | API 密钥(建议使用环境变量) |
models[].contextWindow | 上下文窗口大小 |
models[].maxTokens | 最大输出 token |
macOS App(Beta)
OpenClaw 提供 macOS App,带有图形化 Onboarding 向导:
- 下载地址:OpenClaw 官网
- 功能:图形化配置 Gateway、权限申请、CLI 安装
⚠️ 注意:macOS App 为 Beta 版本,周边组件可能存在不稳定 Bug,建议以 CLI 为主。
Install Daemon
Onboarding 流程中会询问是否安装后台服务,或手动运行:
openclaw onboard --install-daemon这会:
- macOS:创建 LaunchAgent plist
- Linux:创建 systemd user unit
- 设置开机自启
- 后台运行 OpenClaw gateway
常用命令
# 查看状态
openclaw status

# 查看日志
openclaw logs

# 重启服务
openclaw restart

# 运行诊断
openclaw doctor

# 打开 Dashboard
openclaw dashboard
详细配置
默认 Agent (main)
main 是 OpenClaw 的默认 Agent,配置在 agents.list 中:
{
  agents: {
    list: [
      {
        id: "main",
        default: true,
        name: "Main Agent",
        workspace: "~/.openclaw/workspace",
        model: {
          primary: "bailian/qwen3.5-plus",
          // fallbacks: ["bailian/glm-5", "bailian/kimi"],  // 备用模型列表,主模型失败时自动切换
          // reasoning: { enabled: true },  // 推理模型配置
        },
        identity: {
          name: "OpenClaw",
          emoji: "🤖",
          // avatar: "avatars/bot.png",  // 自定义头像 URL
          // description: "个人 AI 助手",  // 角色描述
        },
        heartbeat: {
          every: "30m",  // 心跳间隔:30m, 1h, 2h 等
          // activeHours: { start: "08:00", end: "24:00" },  // 活跃时间段
          // target: "discord",  // 心跳目标 channel
          // to: "channel:CHANNEL_ID",  // 具体目标 ID
        },
        tools: {
          profile: "coding",  // coding | full | minimal,预设工具权限配置
          // exec: { security: "allowlist" },  // exec 安全策略
          // sandbox: { enabled: false },  // 沙箱模式
        },
        // memory: { enabled: true },  // 记忆功能
        // sandbox: { enabled: false },  // 代码沙箱
      },
    ],
  },
}关键字段:
| 字段 | 说明 |
|---|---|
id | Agent 唯一标识符 |
default | 是否为默认 Agent |
workspace | 工作目录,存储记忆、文档等 |
model.primary | 主模型 |
model.fallbacks | 备用模型列表,主模型失败时自动切换 |
model.reasoning | 推理模型配置(如 o1 系列) |
identity.name | 显示名称 |
identity.emoji | Emoji 标识 |
identity.avatar | 自定义头像 URL |
heartbeat.every | 心跳检查间隔 |
heartbeat.activeHours | 活跃时间段 |
tools.profile | 工具权限配置 |
tools.exec | exec 安全策略 |
sandbox | 代码沙箱配置 |
多 Agent 配置
💡 提示:不一定需要多 Agent。一个 Agent 可以有多个独立 Session:
- Discord 不同 Channel 自动创建独立会话
- Telegram 不同 Chat 自动创建独立会话
- 每个会话有独立上下文,互不干扰
- 多 Agent 适用于需要不同模型、不同 workspace 的场景
可配置多个 Agent 用于不同场景:
{
  agents: {
    list: [
      {
        id: "main",
        default: true,
        name: "Main Agent",
        workspace: "~/.openclaw/workspace",
        model: { primary: "bailian/qwen3.5-plus" },
        // heartbeat: { every: "30m" },  // 心跳配置
        // tools: { profile: "coding" },  // 工具权限
      },
      {
        id: "coder",
        name: "Code Assistant",
        workspace: "~/.openclaw/workspace-coder",
        model: { primary: "bailian/qwen3.5-plus" },
        tools: { profile: "coding" },
        // 独立 workspace,隔离代码项目记忆
      },
      {
        id: "research",
        name: "Research Agent",
        workspace: "~/.openclaw/workspace-research",
        model: { primary: "bailian/glm-5" },
        // 使用长上下文模型,适合文档分析
        // heartbeat: { every: "1h", target: "discord" },  // 主动检查任务
      },
      // 更多 Agent:writer, translator, reviewer ...
    ],
  },
}路由配置(将不同 Channel 绑定到不同 Agent):
{
  bindings: [
    // 按 Channel ID 精确匹配
    {
      agentId: "coder",
      match: {
        channel: "discord",
        peer: { kind: "channel", id: "CHANNEL_ID_FOR_CODING" },
      },
    },
    {
      agentId: "research",
      match: {
        channel: "discord",
        peer: { kind: "channel", id: "CHANNEL_ID_FOR_RESEARCH" },
      },
    },
    // 按角色匹配(服务器成员拥有指定角色时路由到对应 Agent)
    {
      agentId: "main",
      match: {
        channel: "discord",
        role: "ROLE_ID",  // Discord 角色 ID
      },
    },
    // 按 Guild 匹配(整个服务器路由到指定 Agent)
    {
      agentId: "main",
      match: {
        channel: "discord",
        guildId: "GUILD_ID",  // 服务器 ID
      },
    },
    // Telegram binding 示例
    {
      agentId: "main",
      match: {
        channel: "telegram",
        peer: { kind: "chat", id: "CHAT_ID" },
      },
    },
  ],
}ACP Agent
ACP(Agent Communication Protocol)用于持久化子 Agent 会话,适合长期项目协作:
{
  agents: {
    list: [
      {
        id: "main",
        default: true,
        // 主 Agent,处理日常对话和任务
      },
      {
        id: "codex",
        name: "Codex Agent",
        runtime: {
          type: "acp",  // 必须设为 acp
          acp: {
            agent: "codex",  // ACP Agent 标识符
            backend: "acpx",  // 后端实现:acpx | acp-local
            mode: "persistent",  // persistent(持久化会话)| ephemeral(临时会话)
            cwd: "/workspace/project",  // 项目工作目录
            // env: { NODE_ENV: "development" },  // 环境变量
            // shell: "/bin/zsh",  // 指定 shell
          },
        },
        // ACP Agent 也可以配置 heartbeat、tools 等
        // heartbeat: { every: "1h" },  // 定时检查项目状态
        // tools: { profile: "coding" },  // 代码工具权限
      },
      // 更多 ACP Agent:docs-agent, test-agent, review-agent ...
    ],
  },
  bindings: [
    // Discord Channel 绑定到 ACP Agent
    {
      type: "acp",  // 显式声明 binding 类型
      agentId: "codex",
      match: {
        channel: "discord",
        peer: { kind: "channel", id: "CODEX_CHANNEL_ID" },
      },
    },
    // Thread 绑定示例(在 Thread 中维护独立会话)
    {
      type: "acp",
      agentId: "codex",
      match: {
        channel: "discord",
        peer: { kind: "thread", id: "THREAD_ID" },
      },
    },
  ],
}
ACP 字段说明:
| 字段 | 说明 |
|---|---|
runtime.type | 运行时类型,必须设为 acp |
runtime.acp.agent | ACP Agent 标识符 |
runtime.acp.backend | 后端实现:acpx(推荐)或 acp-local |
runtime.acp.mode | persistent(持久化会话)或 ephemeral(临时会话) |
runtime.acp.cwd | 项目工作目录 |
runtime.acp.env | 环境变量(可选) |
runtime.acp.shell | 指定 shell(可选) |
bindings[].type | binding 类型,ACP binding 需设为 acp |
参考:ACP Agents
基本通信:Discord Channel
1. 准备 Discord Bot Token
创建 Discord Application 和 Bot:
- 访问 Discord Developer Portal
- 点击 New Application,命名为 "OpenClaw"
- 点击左侧 Bot → Add Bot
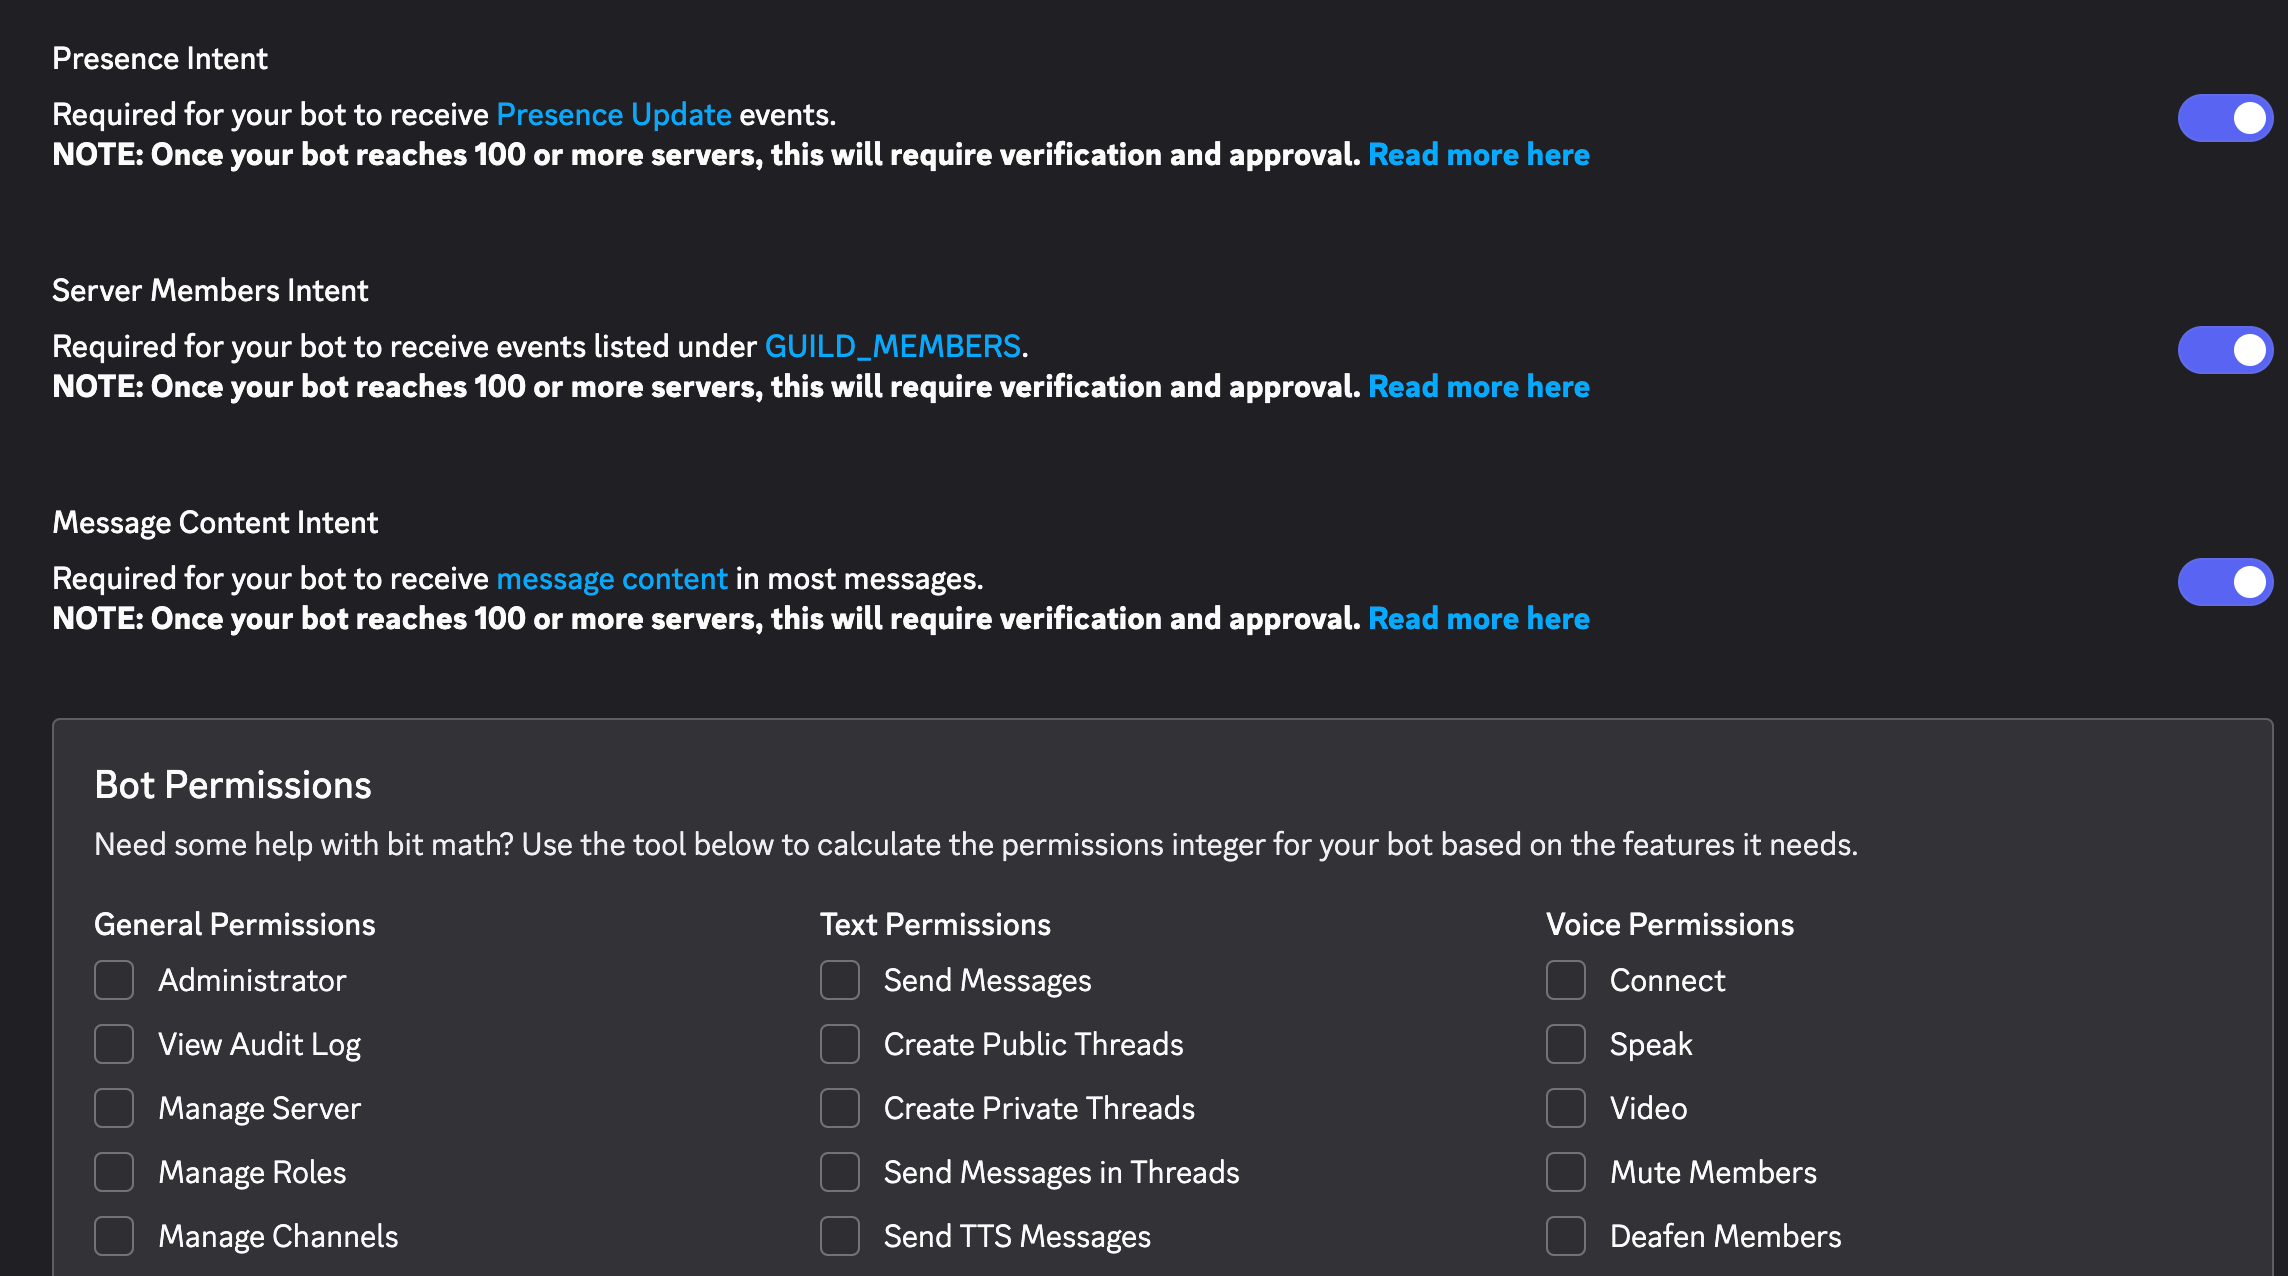
启用 Privileged Gateway Intents:
在 Bot 页面下方启用:
| Intent | 必要性 | 说明 |
|---|---|---|
| Message Content Intent | 必需 | 读取消息内容 |
| Server Members Intent | 推荐 | 角色 allowlist、用户名匹配 |
| Presence Intent | 可选 | 仅用于 presence 更新 |
获取 Bot Token:
点击 Reset Token 复制 Token(首次生成,非重置)。
生成邀请 URL:
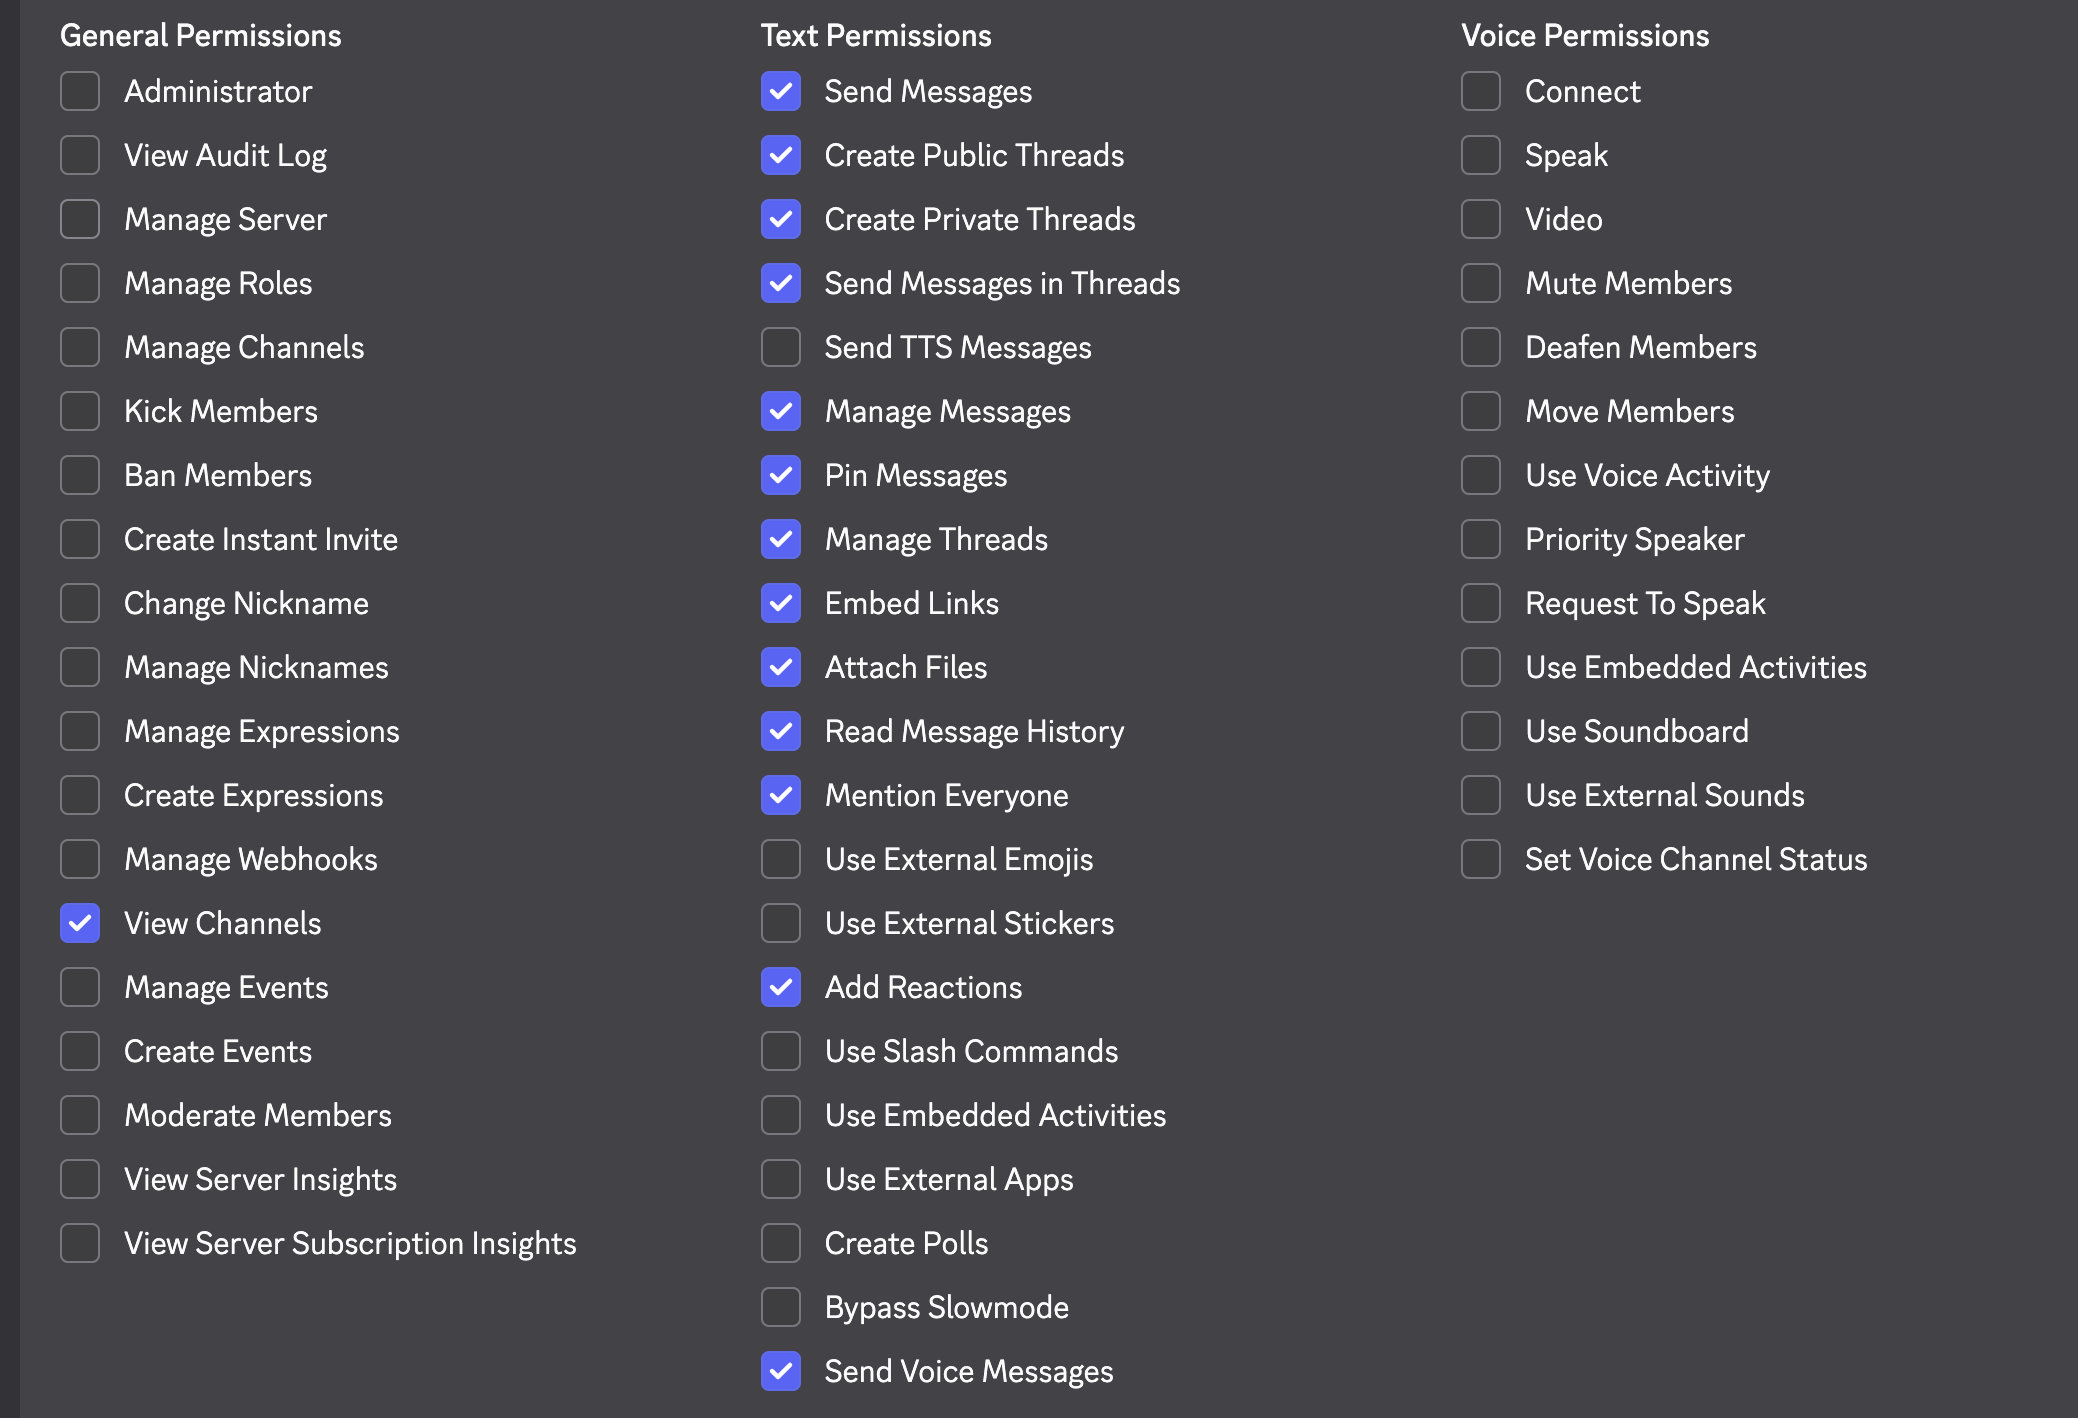
- 点击左侧 OAuth2 → URL Generator
- 勾选 scopes:
bot+applications.commands
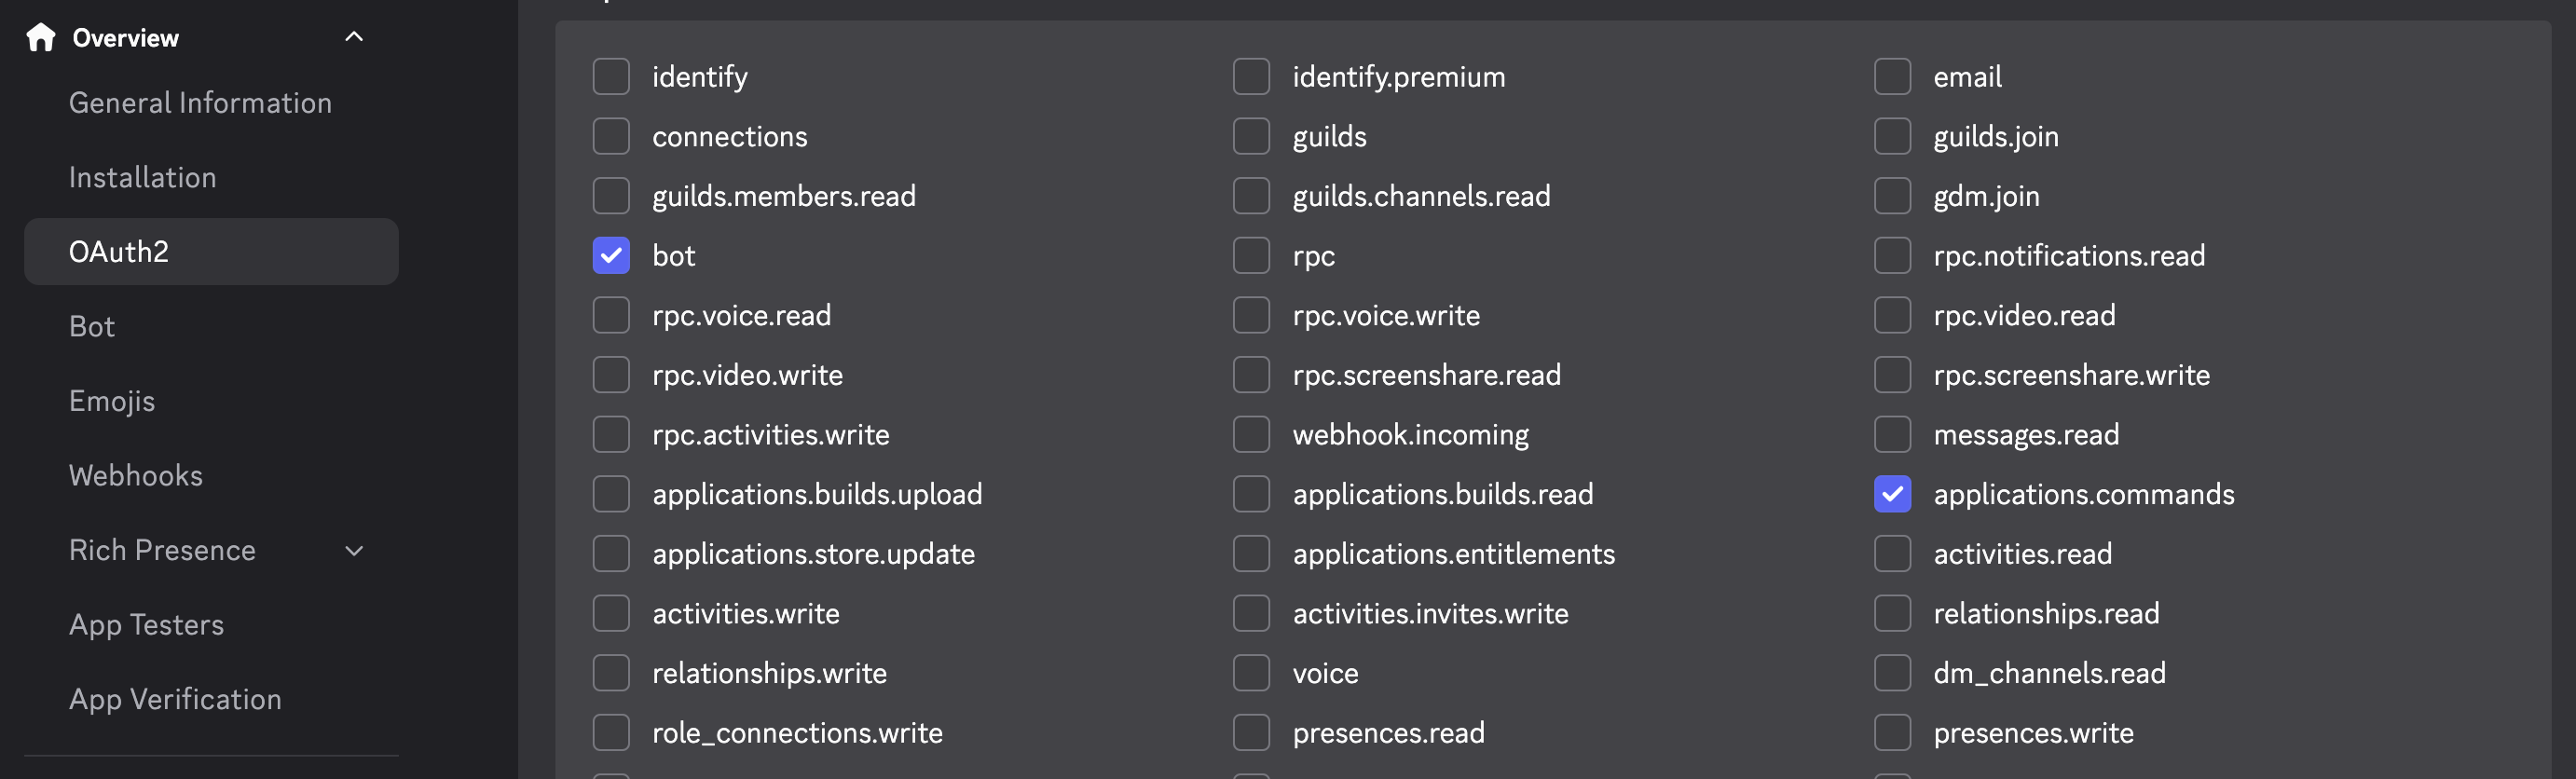
- 勾选 Bot Permissions:
- View Channels
- Send Messages
- Read Message History
- Embed Links
- Attach Files
- Add Reactions(可选)
- 复制生成的 URL,浏览器打开,选择服务器授权
启用 Developer Mode:
- Discord 设置 → Advanced → 开启 Developer Mode
- 右键服务器图标 → Copy Server ID
- 右键自己头像 → Copy User ID
允许服务器成员 DM:
右键服务器图标 → Privacy Settings → 开启 Direct Messages
2. Guild 配置
在 openclaw.json 中配置服务器:
channels: {
  discord: {
    token: "YOUR_BOT_TOKEN",
    guilds: {
      "GUILD_ID": {
        slug: "my-server",
        requireMention: false,
        users: ["YOUR_USER_ID"],
        channels: {
          "CHANNEL_ID": { allow: true },
          // 更多 channel 配置...
        },
        // reactionNotifications, historyLimit 等更多配置请参考官方文档
      },
    },
    // dmPolicy, groupPolicy, voice 等更多配置请参考官方文档
  },
}3. 绑定 Agent 到 Channel
使用 bindings 配置:
bindings: [
  {
    agentId: "main",
    match: {
      channel: "discord",
      peer: {
        kind: "channel",
        id: "CHANNEL_ID",
      },
    },
  },
  // 可添加更多绑定,支持 roles 匹配、guildId 匹配等
]通信机制
| 功能 | 说明 |
|---|---|
| 消息接收 | Bot 接收 Channel 消息,路由到对应 Agent |
| 消息回复 | Agent 处理后通过 Discord 发送回复 |
| Emoji 反应 | 支持对消息添加 emoji 反应 |
| 线程支持 | 可在 Thread 中维护独立会话 |
Discord 特性配置
channels: {
  discord: {
    streaming: "partial",  // off | partial | block | progress
    maxLinesPerMessage: 30,
    actions: {
      reactions: true,
      stickers: true,
      polls: true,
      messages: true,
      threads: true,
      // moderation, roles, presence 等更多 actions...
    },
    ackReaction: "👀",
    activity: "Playing",
    status: "online",
    // voice, threadBindings, autoPresence, replyToMode 等更多配置请参考官方文档
  },
}基本技能:Skills
Skills 概述
Skills 是 OpenClaw 的核心扩展机制,定义 Agent 可用的工具和能力。
配置 Skills
加载目录:
skills: {
  load: {
    extraDirs: [
      "~/.openclaw/.agents/skills/",
    ],
  },
  // 其他 skills 配置请参考官方文档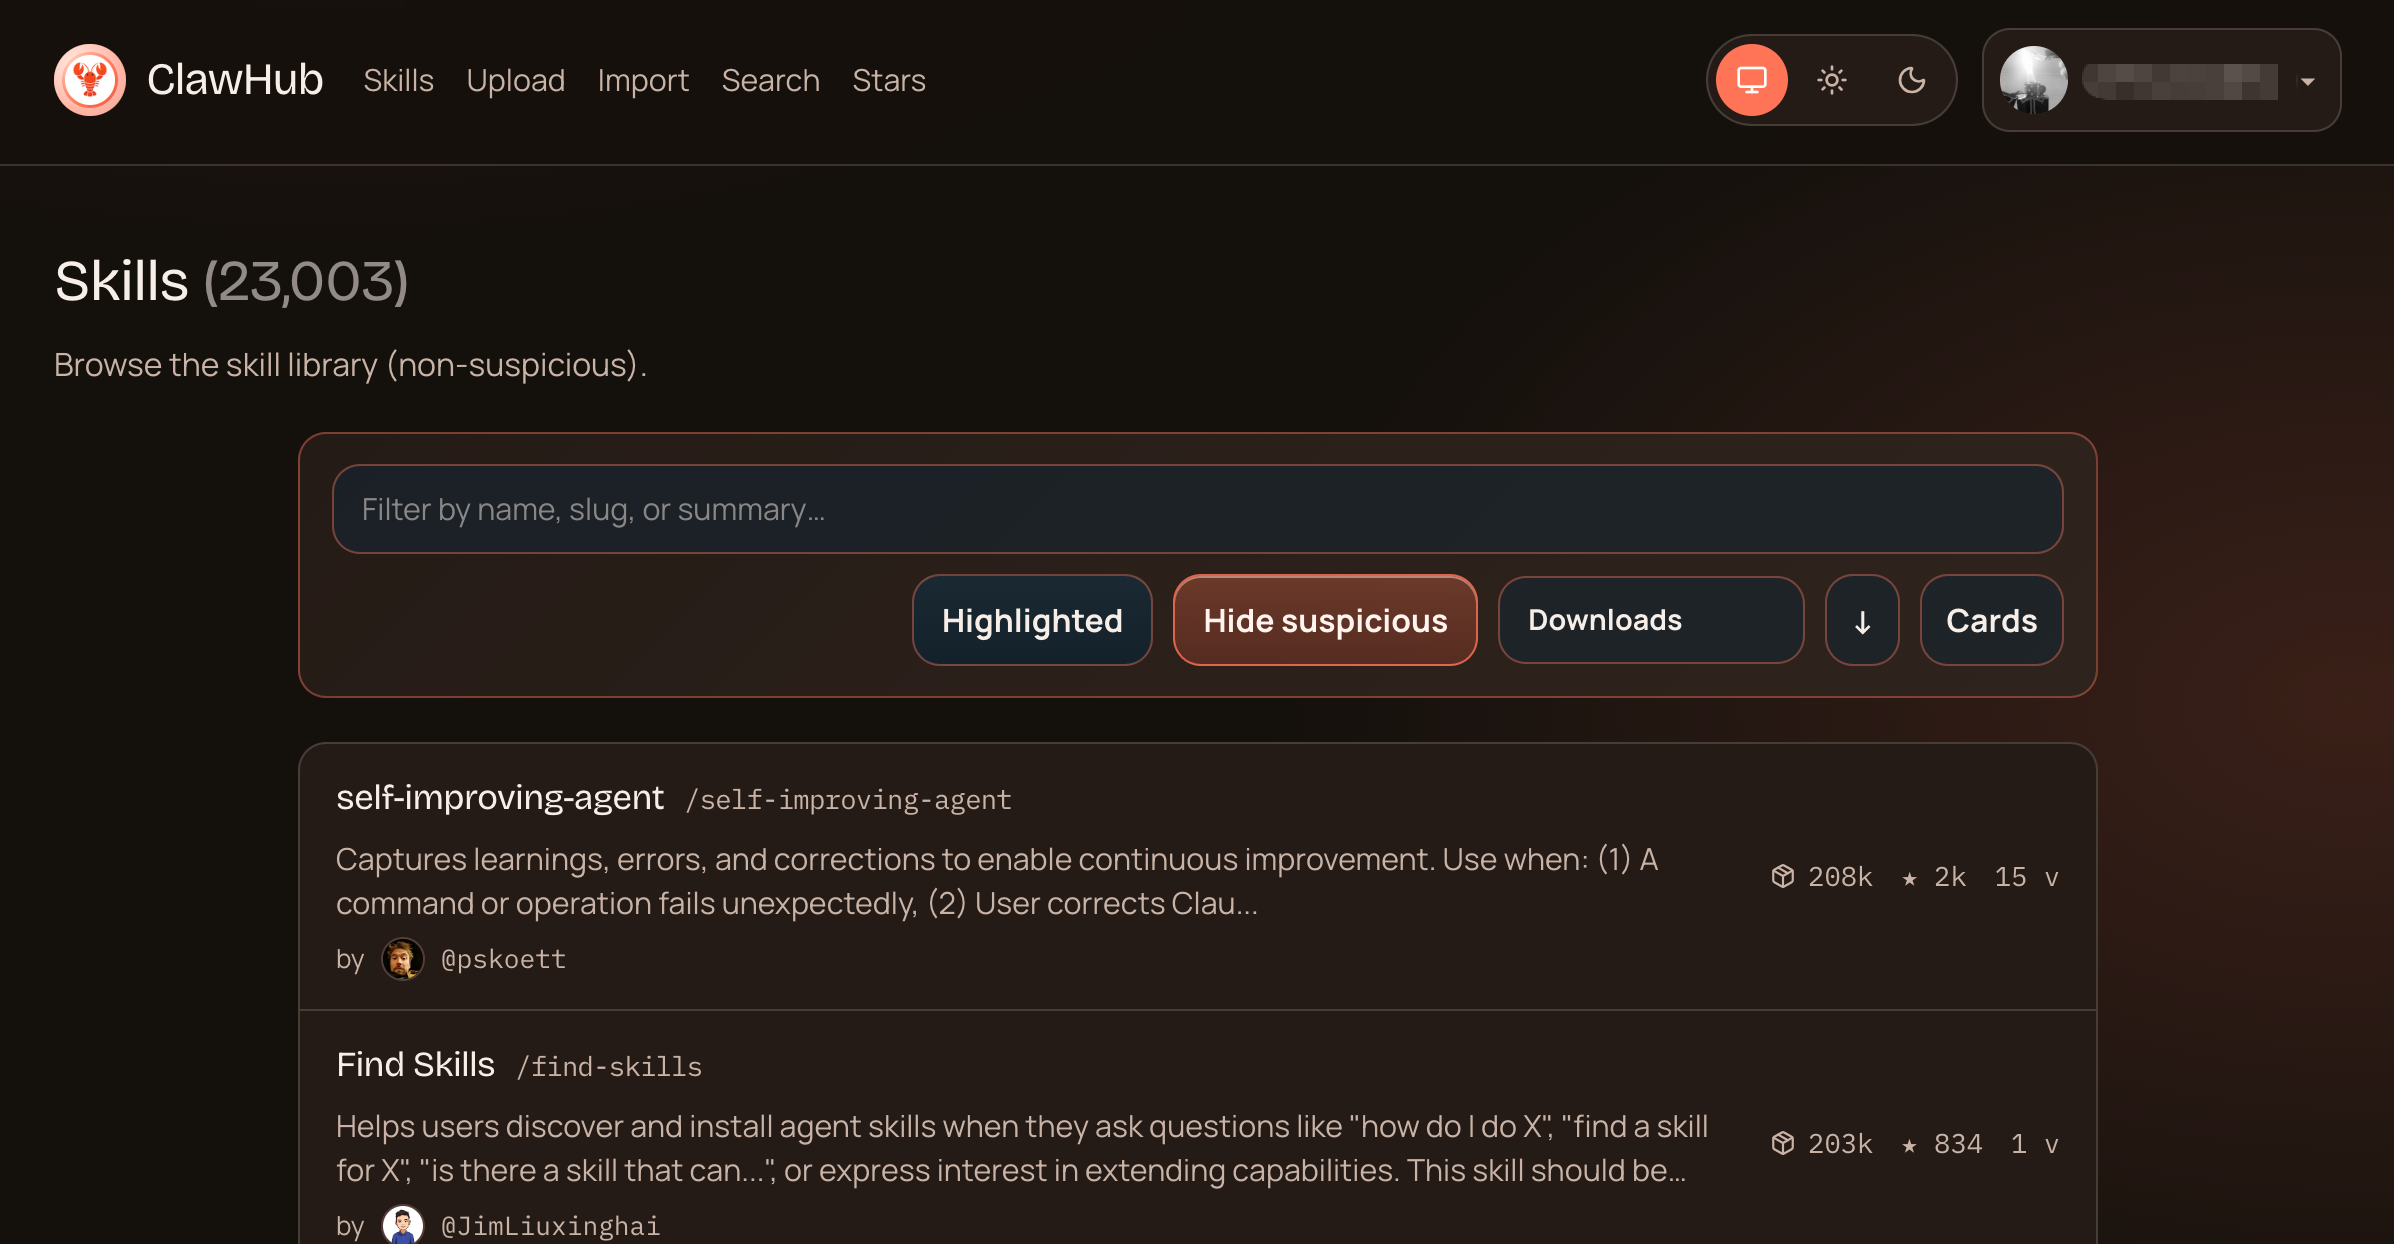
}ClawHub Skills
ClawHub 是 OpenClaw 的公共技能市场(registry),所有技能公开、免费。
安装 clawhub CLI:
pnpm add -g clawhub
# 或 npm i -g clawhub
常用命令:
# 搜索技能
clawhub search "calendar"

# 安装技能到工作区
clawhub install <skill-slug>

# 更新所有已安装技能
clawhub update --all

# 查看已安装技能列表
clawhub list

# 发布自己的技能
clawhub publish ./my-skill --slug my-skill --name "My Skill" --version 1.0.0
浏览技能市场: https://clawhub.ai
⚠️ 安全提示:ClawHub 上的技能由社区贡献,安装前务必检查:
- 查看
SKILL.md中的权限声明和所需工具- 检查技能代码是否有可疑命令(尤其是
exec调用)- 优先选择下载量大、评价高的技能
- 敏感技能(如访问 API、执行系统命令)建议先审计再使用
- 防止技能投毒,保护个人隐私和系统安全
内置 Skills
OpenClaw 安装时自带一系列 bundled skills,位于 npm 包或 OpenClaw.app 内部。
Skills 加载优先级(高→低):
<workspace>/skills- 工作区 skills(最高优先级)~/.openclaw/skills- 本地 managed skills- bundled skills - 安装自带(最低优先级)
查看可用 skills:
# 列出所有 skills
openclaw skills list

# 只列出已满足依赖的 skills
openclaw skills list --eligible

# 查看 skill 详情
openclaw skills info <skill-name>

# 检查哪些 skills 缺少依赖
openclaw skills check
常用 Skills
| Skill | 用途 |
|---|---|
git-commit-helper | 自动检查 Git 状态并按功能单元提交 |
update-exec-approvals | 更新命令执行白名单配置 |
openspec-propose | 生成变更提案 |
openspec-apply-change | 实现变更任务 |
openspec-explore | 探索模式和需求分析 |
openspec-archive | 归档已完成的任务 |
自定义 Skill
在 ~/.openclaw/workspace/skills/ 创建 SKILL.md:
---
name: my-skill
description: 我的自定义技能
license: MIT
---

# My Skill

## Input
触发条件和输入参数

## Task
具体任务步骤

## Output
输出格式和模板
工具权限
Exec 权限控制:
{
  "tools": {
    "exec": {
      "security": "allowlist",
      "ask": "on-miss",
      "safeBinTrustedDirs": [
        "/bin/",
        "/usr/bin/",
        "/usr/local/bin/"
      ]
    }
  }
}
基本 Agent:配置与使用
Agent 结构
每个 Agent 配置包含:
| 字段 | 说明 |
|---|---|
id | 唯一标识符 |
name | 显示名称 |
model | 使用的模型 |
workspace | 工作目录 |
heartbeat | 心跳配置 |
tools | 工具权限 |
配置多 Agent
{
  "agents": {
    "list": [
      {
        "id": "main",
        "name": "Main Agent",
        "model": "bailian/qwen3.5-plus",
        "workspace": "~/.openclaw/workspace",
        "default": true,
        "heartbeat": {
          "every": "1h",
          "activeHours": {"start": "08:00", "end": "24:00"}
        }
      },
      {
        "id": "dandan",
        "name": "Dandan Agent",
        "model": "bailian/glm-5",
        "workspace": "~/.openclaw/workspace-dandan"
      }
    ]
  }
}
Agent 工作区结构
每个 Agent 工作区包含:
workspace/
├── AGENTS.md      # 工作区规则
├── SOUL.md        # Agent 人格定义
├── USER.md        # 用户信息
├── IDENTITY.md    # 身份信息
├── TOOLS.md       # 本地工具配置
├── HEARTBEAT.md   # 心跳任务
├── MEMORY.md      # 长期记忆
├── memory/        # 日常记忆
│   └── YYYY-MM-DD.md
├── skills/        # 自定义技能
└── documents/     # 文档目录
心跳机制
Agent 定时检查并主动执行任务:
{
  "heartbeat": {
    "every": "1h",
    "activeHours": {"start": "08:00", "end": "24:00"},
    "model": "bailian/qwen3.5-plus",
    "target": "discord",
    "to": "channel:CHANNEL_ID"
  }
}
心跳任务定义在 HEARTBEAT.md:
# HEARTBEAT.md

## Git 检查(每次 heartbeat)
- [ ] 调用 git-commit-helper skill 检查未提交变更
- [ ] 如有变更,按功能单元拆分提交

## 每日整理(09:30)
- [ ] 检查 memory/ 目录
- [ ] 更新 MEMORY.md
- [ ] 归档已完成的日常记录

## 周期性任务
- [ ] 检查日历事件(提前 2h 提醒)
- [ ] 检查邮件(urgent 标记)
- [ ] 天气检查(如需外出)心跳检查清单示例:
| 检查项 | 频率 | 说明 |
|---|---|---|
| Git 状态 | 每次 | 检查未提交变更 |
| 邮件检查 | 30m | 检查 urgent 邮件 |
| 日历事件 | 1h | 提前 2h 提醒 |
| 记忆整理 | 每日 09:30 | 更新 MEMORY.md |
| 天气检查 | 每日 08:00 | 外出前检查 |
附录:常用命令
# 启动服务
openclaw start

# 查看状态
openclaw status

# 查看日志
openclaw logs

# 重启服务
openclaw restart

# 停止服务
openclaw stop

# 运行诊断
openclaw doctor

# 更新
pnpm update -g openclaw
进阶配置:macOS Python 最佳实践
💡 可选阅读:如果你的 Skills 使用 Python 依赖,建议按照以下步骤配置。如仅使用基础功能,可跳过本节。
为什么需要额外配置?
- Homebrew 安装的 Python 默认不在 OpenClaw 的 PATH 中
- macOS 系统限制全局 pip 安装,需要虚拟环境隔离
- OpenClaw 的
env.vars不会覆盖现有 PATH 变量
完整配置步骤
步骤 1:创建虚拟环境
python3 -m venv ~/.openclaw/.venv步骤 2:在 ~/.zshrc 中激活虚拟环境
⚠️ 关键步骤:必须在 shell 配置中激活,OpenClaw 才能继承。
# 添加到 ~/.zshrc
echo 'source ~/.openclaw/.venv/bin/activate' >> ~/.zshrc
source ~/.zshrc

# 验证
which python  # 应显示 ~/.openclaw/.venv/bin/python
步骤 3:配置 openclaw.json
{
  env: {
    shellEnv: {
      enabled: true,   // 从 login shell 继承环境变量
      timeoutMs: 15000
    },
    vars: {
      // 其他环境变量(如 API Key)
      OPENAI_API_KEY: "sk-...",
    }
  }
}
步骤 4:重启 OpenClaw
openclaw restart安装 Skills 的 Python 依赖
# 虚拟环境已自动激活,直接安装
pip install -r ~/.openclaw/workspace/skills/<skill-name>/requirements.txt

# 或使用阿里云镜像
pip install -i http://mirrors.aliyun.com/pypi/simple/ -r requirements.txt
Python CLI 工具管理
| 方案 | 命令 | 适用场景 |
|---|---|---|
| pipx(推荐) | pipx install <tool> | Python CLI 工具(隔离环境) |
| Homebrew | brew install <tool> | 有 formula 的常用工具 |
验证配置
# 1. 检查 Python 路径
which python  # 应显示 ~/.openclaw/.venv/bin/python

# 2. 检查虚拟环境
ls -la ~/.openclaw/.venv/bin/python

# 3. 测试 Python Skills
# 触发需要 Python 的 Skill,检查日志
openclaw logs
Enjoy
文档版本:2026-03-14
部署环境:MacBook Pro, macOS